Wednesday, 26 August 2015

The Pesto Manifesto

I love basil.  Go ahead and ask why don't I marry it.  I would, but I'm not sure if it would have me.  Unlike basil, I'm pretty high maintenance.  The husband I already have will confirm this when he's finished making me coffee.

Thanks, hun.


Nothing sings the praises of the subtle embrace of basil more than a good pesto.  I find store bought pesto to be bitter and very oily.  And expensive.  Holy moly is it expensive!  So there's only one thing left to do:  MAKE HOMEMADE PESTO!

First, the basics:

Pesto is a sauce originating in Genoa, Italy.  It likely got its name from the Italian verb pestare, which means to pound or crush, which is what happens to the garlic and pine nuts in a traditional pesto, oftentimes in a mortar with its accompanying pestle.  Here are the traditional ingredients:

Garlic
Pine nuts
Basil
Salt
Parmigiano-Reggiano
Pecorino
Extra Virgin Olive Oil

Feel free to make a traditional batch.  There are a million versions of the recipe available with the magic of Google.


A word about Parmigiano-Reggiano:

Parmigiano-Reggiano is literally The King of Cheeses.  It is legally only allowed to contain three ingredients:  milk, salt and rennet.  This is what to look for when buying:

source: Wikipedia
 
What it is NOT is anything else.  Disturbing fact:  Outside of the European Union, the term "Parmesan" can legally be used for cheese products "similar" to the real deal.  For those of you worried about this sort of thing, that can include such ingredients as:  cellulose powder (aka wood shavings), potassium sorbate, and cheese cultures.

I'm not telling you what to buy and what not to buy.  I've owned a few of the old reliable green shakers in my day, but would I add it to a homemade pesto?  NO.  Because you can really taste the knock-offs in this case.

That being said, I'm not including Parmigiano-Reggiano in this pesto recipe anyway.

Warning:

Die-hard pesto traditionalists should stop reading at this point.  I'm about to sub in some ringer ingredients for those of us who are feeding giant locust families or don't feel like spending $12 on a half cup of pine nuts (that may be a slight exaggeration, but it's for good effect). 

Here's the thing - due to allergies and illness, some people are on restrictive diets and when I cook for them, I'm always on the lookout for cheats.  This pesto recipe is gluten, nut, and dairy free.  And you will love it.

Ingredients:


1-2 cloves of garlic (I use two, but I love the stuff.  Go to taste.)
1 generous handful of pepitas (Pumpkin seeds, yo)
1 bunch basil (About the same size as a bunch of parsley.  You can find it in this quantity at good veggie and farmers markets)
1/2 bunch parsley (SuperFood extraordinaire, and I use any excuse to add it to my meals)
Juice of 1/2 lemon or 1-2 Tbsp balsamic vinegar - optional (It just adds a little zing to the thing)
Extra virgin olive oil (EVOO)
*4 Tbsp nutritional yeast flakes (say what?  Bear with me.)*

Blender
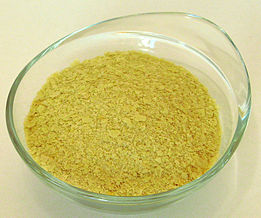
source:  Wikipedia


*Nutritional Yeast facts:
 It's a deactivated strain of yeast, high in B-complex vitamins.  You can buy it in most natural food stores and it's often used in vegetarian and vegan meal plans.  Here's the thing:  IT ADDS A NUTTY, CREAMY, CHEESY FLAVOUR to dishes and it's a surprisingly delicious cheese substitute.

Pesto Directions:

1.  Add garlic, pepitas, and about 1/4 cup EVOO to blender and process until relatively smooth. 
2.  Add basil, parsley, salt, lemon juice (or balsamic vinegar), and nutritional yeast and continue blending, adding EVOO as necessary until all ingredients are blended. 

Once blended, pesto should look like this:

Greetings, Comrade!

Add to pasta dishes, serve on grilled meat or veggies, use as a sandwich spread, eat with your fingers right out of the bowl if you don't want to share (not gonna judge). 

Pasta with pesto and fresh tomatoes
 

Same pasta, next day, cold with raw veg - pesto pasta salad

Welcome to the revolution.

Tuesday, 18 August 2015

Belle of the BBQ

Long August days mean BBQ season is in full swing.  If you're anything like me, being invited out is a mixed blessing; snarfing down delicious grub someone else prepared (and being scooted away when you try to "help" clean up) is the definite upside.  The downside - trying to come up with a unique gift or dish to bring.

I've made my views on deli potato salad clear in a previous post, but to recap:  ZZZZZZZ.  Here's a little jar of happiness that will get you invited back every time - if for nothing else, just to see what amazing wonder you'll bring with you next, and best of all, won't break the bank!

Blueberry Onion Jam

Like most of my creations, this one came about from poor planning and good luck.  Being a procrastinator and one of those people who hates the idea of having to go anywhere until I'm actually there and having an awesome time, I live in the twilight world of denial.  I do nothing to prepare for an event then panic the day of and whip my family into a frenzy of idea-sessions and last minute peeling (I'm sure they love it).

But, as it were, once again I found myself party-bound with no dish or "host(ess)" gift.  A quick survey of the fridge and pantry left me with an inventory that included:


Extra virgin olive oil (EVOO to us from now on)
1 red onion, sliced
1 pint of fresh blueberries (though frozen would also do off-season)
1-2 Tbsp. sambal (or any hot sauce - or none - or any amount.  I'm not here to tell you how to live your life, man.)
1/4 cup red wine
splash balsamic vinegar
salt and pepper to taste
1/2 tsp fresh, chopped thyme (optional)

1 mason jar or glass decorative jar, 250mL


1.  In a large frying pan, heat EVOO over medium heat.  Add sliced red onion , salt, and pepper and sauté until soft and golden, about 8-10 minutes.

2.  Add sambal or hot sauce and continue cooking, about 3 minutes longer.


3.  Add red wine and balsamic vinegar.  Stir to combine.


4.  Add blueberries and mix well.  Cook until blueberries pop and take on the consistency of jam.


5.  Add salt and pepper to taste (careful with the "to taste" bit though.  Don't burn your tastebuds off before you get to the BBQ) and the chopped thyme. 


6.  Let cool and spoon into clean jar.

Without canning, will last about 7-10 days in the fridge.  But let's get real...


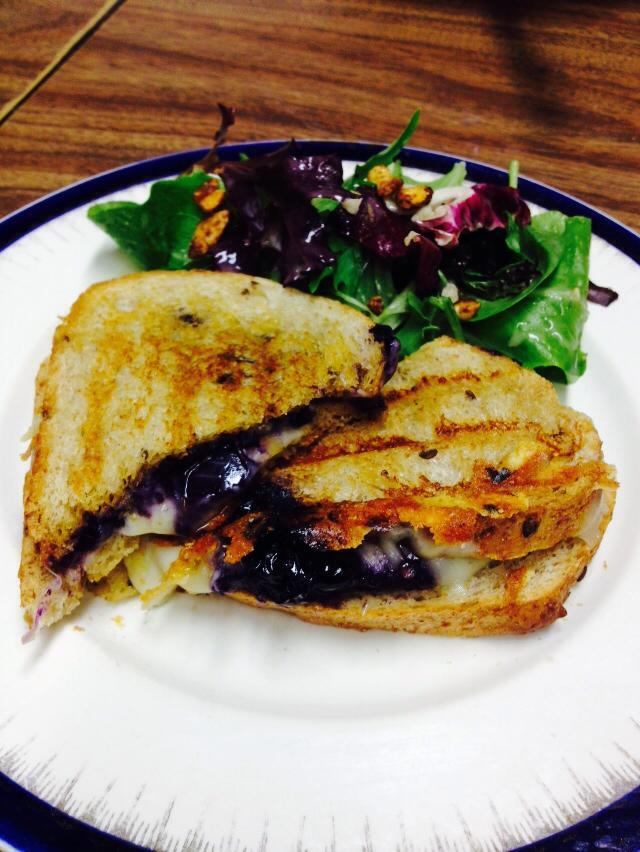
Smoked gouda grilled cheese with blueberry onion jam


Tuesday, 30 June 2015

The Write Stuff

So first of all, my sincere apologies on not having published an entry in this blog for awhile. 

The Husbro and I have been working on a novel (actually a series of them) for the past year and we are nearing completion of the first book.  It's been stressful for us and it is consuming pretty much every spare minute of our time.  It is a multi-person point of view and with several books in the works, everything we write has to be tied in at some point, so I've actually been writing ahead, moving the storyline along, while Husbro takes care of his share of the characters and plot in book one.

This is actually from about a month ago.  A regular novel is usually between 100,000 and 120,000 words.


If you've read this far, I'll take that as a sign there may be hope of someone actually reading this book in the future (though, to be fair, it's not the fast-paced saga of a personal chef making excuses as to why she's not contributing to her food blog...).


So anyway, my apologies again for the distinct lack of food-related posts of late.

To make it up to you, I'm going to give you a couple more dips for your summer BBQs and any entertaining and get-togethers you may have.  With these in your arsenal, you'll be the most popular person there.

Tsatziki:

1 whole cucumber grated (Squeeze all the water out of the cuke after it's grated.  Trust me on this)
1-2 cloves garlic, finely diced
1 1/2 cups Greek yogurt
1/2 cup sour cream
juice of 1 lemon
salt and pepper to taste
Fresh mint, chopped

Combine all of the above.  Let it sit for two hours or overnight.  Serve with fresh veggies or tortilla chips (or over roasted potatoes, or with kebabs, or on burgers, or on anything else you can think of).

For realz:  I had this for breakfast on Sunday morning.


Roasted Red Pepper Feta Dip

Now this little number is pretty AND smart.  First of all, it looks amazing.  And second, people will hold you for ransom to get this recipe.  I just feel that bad about not having posted anything in so long, I felt obliged to give you a serious gift.  And this recipe is that.

3/4 cup feta cheese
3 red peppers, seeded and quartered
2 cloves garlic
1 jalapeno, seeded
1/4 cup olive oil
salt and pepper to taste

Place oven rack in top position.  Set oven to broil.  Place peppers SKIN SIDE UP on a cookie sheet.  Broil 8-10 minutes or until skins are majority blackened.  Remove pepper pieces from oven and place in bowl of icy water.  Remove skins.  Place pepper strips, jalapeno, garlic and olive oil in blender or food processor.  Blend until smooth, adding more olive oil if necessary.  Add feta and continue to blend until smooth.  Serve chilled with chips, veggies, or get creative.  I used this dip for a vegetarian eggs benny recipe I made for a client breakfast:

Sometimes something is so pretty you get a little choked up...


However you serve it, be prepared to soak up the compliments, job offers, and marriage proposals.

So with these two beauties, along with the hummus recipe from an earlier post, you have no excuse to give in to the lame idea of bringing the macaroni salad from the grocery store deli counter.  We all know you bought it on your way there.

In the meantime, here's a glimpse of what I'm doing instead of soaking up that glorious abundance of vitamin D we've been having lately:


Tuesday, 26 May 2015

Basic Tomato Sauce Doesn't Have to Taste Basic

Confession time:  I learned how to make great tomato-based sauces because of a love of strong coffee.  Back in the day, when the Husbro and I were first starting out, our budget was limited and often stretched to near-breaking.  Grocery buying was an oftentimes painful act of financial contortion.  But man, did we love coffee.  Good coffee, dark coffee, strong coffee (we met and fell in love in a coffee shop, how could we not love the stuff?).

But good coffee can get expensive, even when you're buying the beans and grinding them yourself (as opposed to the grand- frappe-extra-whip-extra-shot-extra-sprinkles-double-cup-double-double monstrosities people spend their money on), so I had to find ways to cut back in other areas.  One of those areas was tomato sauce.   Having never found a particular brand of tomato sauce flavourful enough to win my loyalty, and the fact that the prepared stuff is loaded with salt and sugar, but most importantly, that it was $2-3 more than canned tomatoes, it was an easy swap to homemade sauce, using canned tomatoes.

Of course buying canned tomatoes meant I actually had to build my own flavours (I don't recommend dumping a can of tomatoes over your pasta as is), and through trial and error, I found the most basic of tomato sauces that is anything but basic.

Your tomato sauce doesn't have to be basic either.  The flavour-stacking of a good tomato sauce can take you in some really funky directions but it does help to start with the basics.


So let's talk basics:

The most basic element of a good tomato sauce (and many other sauces) is a mirepoix ( pronounced meer-PWAH if you were wondering).  A mirepoix is a mixture of chopped onion, celery and carrots.  Seriously basic.  


It's sautéed in olive oil or butter (or a mixture) until it starts to caramelize and break down.  I usually keep it on a medium (leaning slightly to medium high heat) stirring often.  This flavour base is used in everything from stocks to soups, and yes, sauces.  While the onion/carrot/celery mirepoix is the traditional French application, there are other ingredients that can be added (green pepper, garlic, etc.).  While it looks finicky, as long as you have a good sharp knife, after a few rounds, it takes less than 10 minutes to chop.  You'll be glad you did.  Add your salt and pepper now as it also helps to break down the veg and integrate the flavours.


Welcome to the Cheat:


I found this at the dollar store.  Seriously, it cost $1.25.


Onion flakes, garlic flakes, chili flakes and a tomato-kind of seasoning.  It's mild, and go easy on the chili, but it's a quick and easy add.


Now for the Good Stuff:


I wait until my basic mirepoix has broken down a bit (7-10 minutes) to add my garlic.  It's a much quicker cook because it's much smaller.  If you scorch your garlic, game over.  Throw it out and start again.  There is no fix for that.  So as you can see my Big Three have broken down considerably.  Lower your heat to medium.


Check This Out:


These were diced tomatoes a minute ago.  I prefer crushed, but hey, I still like to save a buck so whatever is on special is what's in my cupboard.  And diced keeps my options open.

Blender takes care of the "diced" situation but first things first.


Because Wine:

A nice addition to this sauce is about 1/4 cup of red wine. 


And the even nicer thing is that leaves a lot left in the bottle.  Husbro and I prefer red wine over coffee when it comes to pasta (which is ultimately where we're headed tonight).  Let that simmer over med heat another five minutes, stirring frequently.


Here We Go:


Pretty.

This is your basic tomato sauce.  You want to turn your heat to low so you A. don't burn it, and B. don't have a million blobs of splattered tomato sauce to clean off of your oven.  Add more salt and pepper to taste.  Enjoy.

Or we can go a few steps further.


Next Stop, Rose:

This is another cheat and I do it because I never trust the acidity of the tomatoes not to curdle my cream, but a true rose uses cream and frankly, it's not something I generally have on hand (For sauces.  Coffee, yes, sauces, no.).  But I will usually have sour cream.  I added about 1/3-1/2 cup and got this little beauty.


I also like to add fresh chopped parsley and basil to all my sauces, but I like to wait until close to the end.  This particular sauce also contains some of the pulled chicken from last week's post and capers.  I mean, once you have the basics, you can really go wherever you like.


Just because it's so pretty, here is the finished product:


Not so basic-looking now, is it?  But you and I know better.


Monday, 11 May 2015

Let's Talk About Oats, Baby

Now that blog title is dating myself.  Sigh.

But let's talk about oatmeal.  I like to get as much nutritional bang for my buck as I possibly can into a meal and oatmeal is one of those all-around workhorse types.  But don't take my word for it:

http://www.whfoods.com/genpage.php?tname=foodspice&dbid=54

Just check out all the things these magic little flakes can do!  Go ahead and Google search those health benefits.  It would give you a lot of reading to do!  As for me, it's an unexpectedly rainy morning and I'm more interested in getting a bowl of this into my belly.  So let's make with the recipes already.

First of all, I stick with quick oats - please don't think I mean instant oatmeal.  That stuff packs a sodium punch I just don't care to deal with first thing in the morning.  I'm talking about regular old Quaker quick oats.  They really are true to their name and you can have a steaming bowl of goodness in less than 10 minutes.  Dollar for dollar, the bag of oats you buy is a lot cheaper than anything you buy pre-packaged too, and this way, you get to flavour it yourself.  No chemicals.

Oats themselves are dead easy to cook:  I use four heaping tablespoons per person.  I dump it in a pot.  I use just enough water to cover those bad boys and add a dash of salt.  I also usually throw in cinnamon at the start, then more can be added later, if the urge strikes.  Now's when you get to have fun:

Cook it on med-high heat, stirring frequently until you reach the consistency you want.  Like, I'm talking 3-5 minutes.  It's just that fast.  Now you figure out what you have in the pantry to add.  The lovely little concoction below involves maple syrup, apples, and pecans.  That's it.  I dice an apple (skin and all) and toss it in while the oatmeal is cooking.  The high heat will semi-cook the apple chunks, softening them and adding their juice to the overall flavour, while the crushed pecans add a nice little crunch.  It tastes more like dessert than breakfast, but so healthy!  And easy on the eyes too. 

What else can you add? 


Oatmeal with toasted pecans, banana and maple syrup


Treats like raisins, cranberries, almonds (or whatever nut or seeds you may have on hand - if you don't have nuts handy but still want a little crunch, throw on a handful of other cereal right at the end - some cheerios, raisin bran, just give them a half-hearted squeeze first, so their original form breaks up a bit), frozen blueberries (any frozen fruit, really, just toss it in while it cooks and voila!).  I've even stirred in a tablespoon of peanut butter and a sliced banana (leave that till serving).  Sweeteners can be anything from brown sugar to honey, or if you're feeling particularly grown up and suave (which happens sometimes, I've heard), leave the sweetener out altogether and just let the added fruit do the job.


Oatmeal with peaches, strawberries and pepitas


If you choose to add milk, more power to you.  I find oatmeal has been an acquired taste, and I just prefer it without milk.  My kids gobble it up, it keeps in the fridge and believe it or not, you can toss it right back in a pot or even into the microwave to reheat.  If we have any left from breakfast, the kids usually fight over who gets the leftovers after school.

I think the thing I love best is that it's such a simple and inexpensive base for something that is not only fun to dress up, but so healthy - and on a cold or busy morning, it is like a hug inside your stomach.  Not to get too cheesy, but jeez, it's true.

Oatmeal with blueberries and cranberries

Ending on another '90s song reference:  Oats, oats, baby.

Wednesday, 6 May 2015

Happy Hummus

Hummus; the Gateway Dip


Hummus is a dip made primarily of chick peas (garbanzo beans).  It is Mediterranean in origin, with recipes tracing from Lebanon to Greece and beyond.  It's crazy healthy, amazingly cheap and one of my family's favourite go-to foods.  We eat it with everything from raw veggies to wraps to tortilla chips and beyond.  It's an awesome source of nutrients (a one cup serving of chick peas contains 50% of your daily potassium needs, 2% vitamin A, 21% calcium, 13% vitamin C, 69% iron, 2% sodium55% vitamin B6, and 57% magnesium).  One cup of cooked chickpeas contains 269 calories, 45 grams of carbohydrates, 15 grams of protein, 13 grams of dietary fiber, 4 grams of fat and 0 grams of cholesterol.  Chickpeas also contain vitamin K, folate, phosphorus, zinc, copper, manganese, choline and selenium.  They're also vegan and gluten-free.  Is there anything chick peas can't do?  I don't know if I'd trust them to do my banking, but I might consider leaving them in charge of the kids if I were to head to the store or something!  They're pretty responsible.

Hummus as a dip is also pretty forgiving.  I'm a big fan of EASY, and opening a can of chick peas is about as easy as it gets - cheap too.  I always rinse my canned beans and chick peas are no exception.  That goo water just isn't appetizing and it can throw the liquid balance off on the recipe.  Rinsing also removes some of the sodium in canned beans so if you're trying to cut back on sodium, it's definitely something you want to get into the habit of doing.  Anyway, here's the thing.  I sometimes don't have tahini - the sesame paste that is an ingredient in hummus.  Don't sweat it if you don't.  There is a certain smoky flavour and silkiness it adds, but we're dealing with reality and sometimes you just don't have it.  The other thing is hummus can be made in a blender.  I remember not having a food processor one Christmas and I made all these recipes where it called for a food processor.  I knew my mom had bought one for me but I couldn't open it until Christmas day...it was either chop by hand, or make use of the blender.  As long as you add your liquid, your blender should work just fine.

Here's my basic hummus recipe.  Feel free to add and subtract to your tastes.  Experimentation is part of the fun.  If you have parsley or cilantro, throw lime juice in instead of lemon juice.  If you like a little heat, squirt some siracha into the mix.  If you're looking to add another source of protein, toss in some tofu.  It contains all eight essential amino acids. Tofu's also an excellent source of iron and calcium and the minerals manganese, selenium and phosphorous. In addition, it's a good source of magnesium, copper, zinc and vitamin B1.  Experiment to suit your tastes.  If you're going to the dentist, cut back to one clove of garlic (unless you want to punish your dentist, then add more garlic!).  Try the original, but like I said, add and subtract as you have ingredients.  If you stumble upon a winner, pass it on!  I'd love to hear about it.

Abby Community Kitchen Basic Hummus


1 can garbanzo beans (chick peas), drained and rinsed
1 - 2 cloves garlic, peeled
Juice of one lemon
1/4 cup tahini
4 - 5 tbsp. olive oil (plus a dash for serving)
1/2 tsp salt (or to taste)
1/8 - 1/4 tsp pepper (or to taste)
1/2 tsp paprika (for serving)

Add lemon juice, olive oil and garlic to blender or food processor.  Add tahini, chick peas and remaining ingredients (except paprika) and blend on high until smooth and creamy.

Spoon into serving bowl and add remaining olive oil and paprika.

Cilantro Lime Hummus
This is a batch of cilantro lime hummus I made for the family.  I love to make it ahead (usually doubling the recipe) and leaving it in a glass jar with a lid in the fridge for the family to eat on whatever they choose.  I like to make meals and snacks for the week ahead as much as possible, but we'll get into that in another upcoming post.  In the meantime, I hope you give hummus a try.  As I mentioned, if you experiment and hit on a winner, let me know!

Happy Hummusing!